Organization and Workflow for Efficient Cooking
Learning Objectives
By the end of this course, you will be able to:
- Analyze your kitchen’s work triangle (refrigerator, sink, stove) and optimize tool placement around its strengths and limitations
- Establish distinct work zones—prep zone, cooking zone, cleaning zone, and landing zone—that support efficient workflow
- Set up your cutting board properly: stable positioning using the damp towel technique, correct height for ergonomic cutting, and organized workspace around the board
- Apply the frequency principle to organize tools into active storage (daily use, immediately accessible) versus deep storage (occasional use, cabinet storage)
- Organize ingredients systematically: refrigerator by safety hierarchy, pantry by category with visibility, spices for quick access
- Implement the mise en place mindset and progressive cleaning principle that professionals use for smooth workflow
- Coordinate multi-task cooking through strategic positioning and timer management
- Ensure adequate lighting at your prep station to enable safe, precise knife work
Skill Ontology Classification
| Ontology Category | Classification |
| Skill Type | Kitchen Foundations > Workspace Systems > Organization and Workflow Optimization |
| Technique Categories | Workflow Analysis (work triangle, zone definition, path optimization), Cutting Board Setup (stabilization, positioning, ergonomics), Tool Organization (active vs. deep storage, knife storage, utensil access), Ingredient Organization (refrigerator hierarchy, pantry systems, spice management), Workflow Execution (mise en place mindset, progressive cleaning, multi-task coordination) |
| Quality Outputs | Efficient cooking with minimal wasted movement, safe and stable prep station, tools accessible at point of use, ingredients visible and organized, smooth workflow without interruptions for searching |
| Cooking Interactions | Enables all knife skills courses (stable board, proper positioning), supports mise en place methodology (organized staging), facilitates multi-component cooking (zone separation, timer coordination), integrates with sanitation practices (cleaning zone, progressive cleaning) |
| Prerequisite Skills | Course 1 (Kitchen Safety—cutting board stability, cross-contamination zones), course 2 (Essential Tools—understanding what tools need storage and organization) |
| Unlocks Skills | Course 4 (Stove and Oven Controls—cooking zone utilization), course 5 (Kitchen Sanitation—cleaning zone workflows), course 16 (Mise en Place—complete preparation system), All knife skills courses (6–10), All cooking technique courses |
Essential Workspace Terminology
| Term | Definition |
| Work Triangle | The spatial relationship between refrigerator, sink, and stove—the three points accessed most frequently during cooking; ideally totaling 12–26 feet combined distance; understanding your triangle’s layout enables intelligent tool and ingredient positioning |
| Work Zone | A dedicated area of the kitchen optimized for a specific type of task: prep zone (cutting and ingredient preparation), cooking zone (stove and active cooking), cleaning zone (sink and dishwashing), landing zone (staging area near refrigerator) |
| Active Storage | Storage locations for items used multiple times per week, positioned for immediate access without opening cabinets or drawers; items are visible and reachable in seconds; examples include knife blocks, utensil crocks, and vertical cutting board racks |
| Deep Storage | Storage locations for items used occasionally (less than once per week), stored in cabinets, drawers, or pantries where retrieval requires more effort; appropriate for specialty bakeware, holiday items, and single-purpose gadgets |
| Mise en Place | French culinary phrase meaning ‘everything in its place’—the practice of preparing and organizing all ingredients and tools before cooking begins; transforms cooking from reactive chaos into controlled execution; covered in depth in course 16 |
| Progressive Cleaning | The professional practice of cleaning during natural cooking downtime—washing prep bowls while food simmers, wiping counters while pasta boils; prevents mess accumulation and ensures clean tools remain available throughout cooking |
| FIFO | First In, First Out—the inventory rotation principle where older items are moved forward and used before newer items; prevents expiration and waste; applied to pantry organization by placing new purchases behind existing stock |
Welcome to your third foundational course in the Chefts culinary education system. At Chefts, we teach you to think like a chef—and professional chefs know that workspace organization directly determines cooking efficiency and safety. This course teaches you how to transform any kitchen into a functional, organized workspace where proper technique becomes natural rather than forced.
Watch a professional cook work and you’ll notice something remarkable: they barely seem to move. Everything they need is within arm’s reach, positioned exactly where they’ll use it. They don’t search for tools mid-recipe, don’t walk back and forth across the kitchen, don’t interrupt their workflow to hunt for ingredients. This isn’t because they have better kitchens—professional restaurant kitchens are often cramped and poorly designed. It’s because they understand workspace organization and workflow efficiency.
Most home cooks fight their kitchens. They position cutting boards in awkward spots, keep tools in drawers far from where they’re used, work in poor lighting, and constantly interrupt cooking to search for items. Then they blame themselves for being slow or clumsy when the real problem is workspace setup. A properly organized workspace doesn’t just make cooking faster—it makes proper technique possible by removing physical and mental obstacles.
Throughout the Chefts curriculum, workspace organization enables every technique we teach. When we cover mise en place in an upcoming course, you’ll understand why proper workspace setup makes ingredient preparation exponentially more efficient. As you master knife skills, you’ll appreciate how cutting board positioning affects control and safety. Every advanced technique assumes your workspace is properly configured.
Part 1: Understanding Kitchen Workflow and Zones
The Hidden Logic of Kitchen Movement
Kitchen Workflow: The natural pattern of movement and task progression that occurs during food preparation and cooking. Understanding workflow means recognizing that cooking happens in a predictable sequence: retrieve ingredients, prepare ingredients, cook ingredients, plate food, clean up. Your kitchen layout should support this sequence rather than fight it.
The Classic Work Triangle
Kitchen designers reference the work triangle—the relationship between refrigerator, sink, and stove. This triangle defines your primary workspace because nearly every cooking task requires accessing at least two of these three points. Ideally, the combined distance of all three legs totals 12–26 feet—close enough for efficiency, far enough to avoid crowding.
You can’t change your kitchen’s triangle, but you can work with it intelligently. Analyze your triangle: Is your sink close to the stove (making it easy to add water to pots)? Is your refrigerator near your main prep area (reducing steps when gathering ingredients)? Understanding your triangle’s strengths and weaknesses helps you position tools and establish work zones that complement rather than fight your layout.
If your triangle is awkward—refrigerator far from stove, sink isolated in a corner—you compensate through strategic organization. Store frequently-used ingredients closer to where you cook rather than deep in the refrigerator. Position a small prep bowl near the stove for ingredient staging. Use a cart to bring everything to your main work area before cooking begins.
Defining Your Work Zones
The Prep Zone: Your main cutting and ingredient preparation area. This zone needs a large cutting board, sharp knives, prep bowls for organizing cut ingredients, and trash/compost access. Position this near your refrigerator (minimizes walking with ingredients) with adequate counter space (at least 24 inches wide). Good lighting is critical here—shadows create mistakes. If space allows, separate prep from cooking by at least 18 inches.
The Cooking Zone: The area immediately surrounding your stove and oven. This zone needs heat-resistant surfaces for hot pans, cooking utensils (spatulas, tongs, spoons) within arm’s reach, frequently-used seasonings (salt, pepper, oil), and pot holders. Avoid cluttering this zone with items that don’t relate to active cooking. The cooking zone is not storage—it’s an action area.
The Cleaning Zone: The sink area and immediate surroundings. This zone handles dish washing, food waste disposal, and hand washing. Keep dish soap, scrub brushes, and towels here. Designate space for dirty dishes (not scattered across counters) and a drying rack or mat for clean dishes. The cleaning zone should be separate from prep and cooking zones to prevent cross-contamination.
The Landing Zone: Counter space near your refrigerator and pantry where groceries land when you come home and where you stage ingredients before cooking. This zone prevents ingredient sprawl across your entire kitchen. When preparing to cook, gather everything to the landing zone first, then move to your prep zone.
The Path Principle: Minimizing Movement
Efficiency in the kitchen means minimizing unnecessary movement. Professional cooks measure their effectiveness partially by how little they move—wasted motion is wasted time and energy. The path principle states that items should be stored at their point of first use or as close to it as possible.
Analyze your common tasks and position tools accordingly: Knives near the cutting board (not in a drawer 10 feet away). Cooking utensils in a crock next to the stove (not in a drawer that requires walking away from active cooking). Cutting boards stored vertically near the prep zone (not stacked horizontally in a bottom cabinet requiring bending and rearranging). Coffee supplies near the coffee maker. Dish soap next to the sink.
Walk through your most common cooking tasks mentally and physically, noting every time you walk across the kitchen, bend down, reach up, or search for something. Each of these moments represents an opportunity for optimization.
Part 1 Summary: Kitchen workflow follows a predictable sequence that your layout should support. The work triangle (refrigerator, sink, stove) defines primary workspace; work with its strengths and compensate for weaknesses. Establish distinct zones for prep, cooking, cleaning, and landing. Apply the path principle: store items at their point of use to minimize unnecessary movement.
Part 2: The Cutting Board Setup—Your Primary Workspace
Creating a Stable, Efficient Prep Station
Your cutting board is your primary workspace for much of cooking—where you’ll spend significant time preparing ingredients. Proper cutting board setup affects safety, efficiency, and technique development. Most home cooks never consider cutting board positioning, simply placing it wherever space exists. Professional cooks obsess over cutting board setup because it’s that important.
Preventing Board Movement: The Damp Towel Technique
A cutting board that shifts during use is dangerous and frustrating. The solution is simple but essential: place a damp (not soaking) kitchen towel or non-slip mat under your cutting board before every use. The dampness creates grip against both the counter and the board bottom, completely preventing movement. This takes 10 seconds and prevents countless accidents.
Test your setup by pressing firmly on the board—it shouldn’t move at all. Many cooks skip this step, thinking their board is ‘stable enough.’ It isn’t. Even minor board movement during cutting creates inconsistency and danger. Your knife control suffers because you’re subconsciously compensating for potential movement. A truly stable board allows complete focus on knife technique rather than board management. This is non-negotiable in professional kitchens—make it non-negotiable in yours.
Optimal Board Positioning
Position your cutting board perpendicular to your body, with your dominant hand on the knife side and your guide hand on the ingredient side. The board should be centered in front of you, not angled off to one side. Angled positioning causes awkward body rotation and poor knife control.
Height matters critically. Your elbows should be bent at roughly 90 degrees when your hands rest on the cutting board. Too high and you lose leverage; too low and you’ll hunch, creating back strain and reducing control. If your counter height isn’t ideal (standard counter height is 36 inches, which is too high for many people), adjust with a thicker or thinner cutting board, or use a cutting board placed on a lower surface like a kitchen table.
Create workspace around your cutting board. You need space on your non-dominant side for cut ingredients (pile them to the side rather than leaving them on the board), space behind the board for whole ingredients waiting to be cut, and space in front for trash or compost. The cutting board itself should be clear—only the item you’re actively cutting belongs on the board surface.
Managing Prep Waste Efficiently
One of the biggest workflow disruptions in home cooking is trash management. Constantly walking to a trash can across the kitchen breaks rhythm and wastes time. Professional cooks solve this with strategic waste containers positioned at their workspace.
Position a small bowl, container, or bag directly next to your cutting board for vegetable scraps, packaging, and waste. This ‘bench scrap’ container eliminates dozens of trips to the trash during prep. Alternatively, pull your trash can directly to your prep zone during ingredient preparation, then return it when finished. The key principle: waste management should not interrupt prep workflow.
Lighting Your Workspace
Adequate lighting is critical for both safety and precision. Shadows across your cutting board make it difficult to see what you’re cutting, leading to imprecise cuts and increased injury risk. Many home kitchens have overhead lighting that creates shadows when your body blocks the light.
Ideal lighting comes from multiple sources: overhead lighting for general illumination plus task lighting directly over your work surface. Under-cabinet lighting works perfectly for this—LED strips are inexpensive and install easily. If permanent installation isn’t possible, use a portable LED task lamp positioned to shine directly on your cutting board without creating glare. The goal is bright, shadow-free light that lets you see exactly what you’re cutting.
Part 2 Summary: Cutting board setup is critical for safety and technique. Use the damp towel technique to prevent all board movement. Position the board perpendicular to your body at proper height (elbows at 90 degrees). Create workspace around the board for ingredients and waste. Ensure adequate, shadow-free lighting. These setup practices should become automatic before every cutting session.
Part 3: Organizing Tools for Maximum Efficiency
Putting Everything in Its Right Place
Tool organization determines whether cooking flows smoothly or becomes a constant treasure hunt. The principle is simple: frequently-used tools should be immediately accessible at their point of use. Less-used tools can be stored in cabinets or drawers. The challenge is honestly assessing frequency of use—most home cooks store everything equally, making common tools as difficult to access as specialty items.
The Frequency Principle: Active Storage vs. Deep Storage
Active Storage: Storage locations for items used multiple times per week, positioned for immediate access without opening cabinets or drawers. Active storage means items are visible and reachable in seconds. Examples include a knife block on the counter, cooking utensils in a crock next to the stove, or cutting boards standing vertically in a rack.
Deep Storage: Storage locations for items used occasionally (less than once per week), stored in cabinets, drawers, or pantries. These items can require more effort to access because you retrieve them infrequently. Examples include specialty bakeware, holiday serving pieces, or single-purpose gadgets.
Audit your tools honestly: What do you actually use multiple times per week? For most home cooks, this list is surprisingly short—one chef’s knife, one paring knife, one cutting board, one skillet, one saucepan, one stockpot, basic cooking utensils, measuring cups, and a few prep tools. Everything else is occasional use. Organize accordingly, giving your true essentials the most accessible locations.
Knife Storage and Accessibility
Your knives are your most-used tools and deserve dedicated, accessible storage. Never store knives loose in drawers where they dull, become dangerous when reaching in, and are difficult to access quickly.
Knife blocks: Traditional countertop storage keeping knives immediately accessible and visible. Choose blocks with horizontal slots (easier knife removal). The downside is counter space consumption—only worthwhile if you use knives daily.
Magnetic knife strips: Wall-mounted strips that hold knives securely by magnetic force, saving counter space while maintaining visibility and accessibility. Install 12–18 inches above counter height for comfortable reach.
In-drawer knife organizers: Slotted trays or inserts that keep knives separated and protected in a drawer. This works if the drawer is next to your cutting board, otherwise it creates unnecessary steps.
Cooking Utensil Storage: The Crock System
Cooking utensils—spatulas, wooden spoons, tongs, whisks, ladles—should be stored vertically in a crock, jar, or utensil holder positioned within arm’s reach of the stove. This is non-negotiable in professional kitchens because it enables one-handed tool access during active cooking. You can’t stop stirring a sauce to open a drawer and search for a spoon—the utensil needs to be immediately available.
Position the utensil crock between your stove and your primary counter space, easily reachable from the cooking zone. Keep only actively-used utensils here—the 5–8 tools you reach for regularly. Specialty items (turkey baster, pastry brush, meat mallet) belong in drawers. An overcrowded utensil crock defeats the purpose by making it difficult to grab what you need quickly.
Pot and Pan Storage Strategy
Cookware storage creates challenges because pots and pans are bulky, heavy, and nest awkwardly. The ideal storage location is as close to the stove as possible—either in a cabinet directly adjacent to the cooking zone or in a drawer beneath the cooktop.
Store pots and pans according to use frequency: Your primary skillet and most-used saucepan should be most accessible (front and center, requiring no rearranging to access). Your stockpot and Dutch oven, used less frequently, can be stored less conveniently. Avoid stacking pans if possible—stacking requires removing multiple items to access the bottom pan. If stacking is unavoidable, use pan protectors between cookware.
Part 3 Summary: Apply the frequency principle: daily-use tools get active storage (visible, immediately accessible), occasional-use tools get deep storage (cabinets, drawers). Knives deserve dedicated accessible storage (block, magnetic strip, or drawer organizer). Utensils belong in a crock within arm’s reach of the stove. Pots and pans store near the stove, organized by frequency of use.
Part 4: Ingredient Organization and Accessibility
Making Everything Easy to Find and Use
Tool organization gets attention, but ingredient organization is equally important for cooking efficiency. Professional kitchens obsess over ingredient positioning because seconds matter during service. Home cooks benefit from the same principles—when ingredients are organized and accessible, cooking becomes faster and less stressful.
Refrigerator Organization by Use and Safety
Refrigerator organization serves two masters: food safety (preventing cross-contamination) and accessibility (finding items quickly). These goals align when you understand proper storage hierarchy.
The golden rule: Raw meat, poultry, and seafood always store on the bottom shelf in containers that catch drips. This prevents juices from contaminating other food—a critical safety principle covered in our kitchen safety course. Never store raw proteins above ready-to-eat foods.
Organize remaining space by use frequency and accessibility: items used daily (milk, eggs, butter, frequently-used condiments) at eye level and front; items used occasionally (specialty ingredients, backup supplies) toward the back; items requiring specific temperatures (dairy, meats, vegetables) in their appropriate compartments.
Pantry Organization for Visibility
Pantry organization follows one core principle: visibility. If you can’t see it, you’ll forget you have it, buy duplicates, and let it expire. Arrange items so you can see everything without moving other items—this means avoiding double-stacking where possible.
Group items by category: All baking supplies together, all grains and pasta together, all canned goods together, all spices together. This grouping creates intuitive storage—when you need flour, you know exactly where all baking supplies live. Category grouping also helps you see what you have, preventing duplicate purchases.
Consider decanting dry goods (flour, sugar, rice, pasta, beans) into clear, airtight containers. This serves multiple purposes: visibility (you see contents and quantity at a glance), protection (airtight storage prevents staleness and pest infestation), and space efficiency (square containers use shelf space better than bags and boxes).
Implement FIFO (First In, First Out): When restocking pantry items, move older items forward and place new items behind. This rotation prevents items from expiring unused in the back.
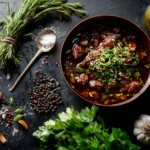
Spice and Seasoning Organization
Spice organization vexes home cooks because spice collections grow organically and chaotically. You buy spices for specific recipes, they accumulate in cabinets, and soon you have 40 jars in no particular order, half of them expired and forgotten.
The solution: dedicated spice storage with visibility and accessibility. Spice drawer organizers create tiered storage where you see all spice labels at once. Spice racks (wall-mounted or countertop) provide visibility and accessibility. Lazy Susans in cabinets enable you to rotate and see all spices. The specific system matters less than the principle: you should be able to find any spice in seconds without moving other spices.
Store frequently-used seasonings—salt, black pepper, garlic powder, paprika, cumin, whatever you reach for most—separately and more accessibly than your full spice collection. Many cooks keep a small selection of everyday spices next to the stove in a small rack or container, while the full collection lives elsewhere.
Part 4 Summary: Refrigerator organization balances safety (raw proteins on bottom shelf) with accessibility (frequently-used items at eye level). Pantry organization prioritizes visibility—group by category, avoid double-stacking, use clear containers, implement FIFO rotation. Spice organization requires dedicated storage with visibility; keep everyday seasonings separately near the stove.
Part 5: Optimizing Workflow During Cooking
Moving Efficiently Through the Cooking Process
Workspace setup enables efficient workflow, but workflow itself requires conscious development. The way you move through cooking tasks—the sequence, the timing, the coordination—determines whether cooking feels smooth or chaotic. Professional cooks develop workflow instincts through repetition, but you can accelerate this learning through intentional practice.
The Mise en Place Mindset
Mise en Place: A French culinary phrase meaning ‘everything in its place,’ referring to the practice of preparing and organizing all ingredients and tools before beginning to cook. This isn’t just prep work—it’s a fundamental workflow principle that transforms cooking from reactive chaos into controlled execution.
The mise en place mindset means you never start cooking until everything is ready: ingredients measured and prepped, tools positioned, workspace clear, recipe reviewed and understood. This seems like extra upfront work, but it dramatically simplifies actual cooking because you’re not simultaneously prepping ingredients, searching for tools, reading instructions, and managing heat. Each task happens in isolation, allowing full attention.
When you begin cooking with complete mise en place, you experience a fundamental shift: cooking becomes assembly rather than chaos. You’re adding pre-measured ingredients to the pan at the right time, using pre-positioned tools, following a clear sequence. This is how professionals cook so smoothly—not because they’re naturally more coordinated, but because they’ve separated prep from execution. Our dedicated course on mise en place will teach this transformative practice in detail.
The Progressive Cleaning Principle
Professional cooks ‘clean as they go’ not because they’re tidy by nature but because a clean workspace enables efficient cooking. Cluttered counters force you to work in smaller spaces, dirty tools create cross-contamination risks, and piles of dishes create mental stress that degrades performance. Progressive cleaning prevents these problems.
The principle: clean during natural downtime in the cooking process. While something simmers, wash prep bowls. While pasta boils, wipe counters. While meat rests, clean the cutting board. These micro-cleaning sessions prevent the accumulation of catastrophic messes and ensure you always have clean tools and clear workspace available.
This doesn’t mean obsessive cleaning that distracts from cooking—you don’t stop stirring a sauce to wash a bowl. It means using the inevitable waiting periods in cooking productively. The result: when you finish cooking, cleanup requires 5 minutes rather than 45 minutes.
Multi-Task Coordination Through Workspace Design
Advanced cooking involves managing multiple dishes or components simultaneously—while pasta boils, you’re making sauce; while chicken roasts, you’re prepping vegetables. This coordination becomes dramatically easier when your workspace supports it.
The key is positioning items so you can monitor and access multiple tasks without moving excessively. If boiling pasta on one burner while making sauce on another, position yourself between them so you can attend to both without turning around or walking. Use back burners for tasks requiring less attention (simmering, keeping warm) and front burners for tasks requiring active management (sautéing, reducing).
Timer management becomes critical in multi-task cooking. Use separate timers for each component rather than trying to remember multiple timings simultaneously. Phone timers, kitchen timers, and stove timers all work—use as many as needed. Position timers where you’ll hear them from your cooking station. This external timing frees your mental attention for technique and judgment rather than time tracking.
Part 5 Summary: The mise en place mindset separates prep from execution, transforming chaotic cooking into controlled assembly. Progressive cleaning uses cooking downtime productively, maintaining clean workspace throughout. Multi-task coordination requires strategic positioning (back burners for passive tasks, front for active) and timer management (separate timers for each component). These workflow principles develop with practice in a well-organized workspace.
Troubleshooting: Common Workspace Problems
| Problem | Cause and Solution |
| Cutting board slides during cutting | Board lacks grip on counter surface. Solution: Place damp towel or non-slip mat under board every time—no exceptions. Test stability by pressing firmly before beginning. |
| Constantly searching for tools while cooking | Tools stored by category rather than by use frequency and location. Solution: Apply the frequency principle—daily-use tools get active storage at point of use; move utensil crock next to stove, knife block next to cutting board. |
| Running out of counter space during cooking | Workspace cluttered with items not needed for current task. Solution: Clear workspace before cooking; stage only what you need; implement progressive cleaning to return items as you finish with them. |
| Food burns while searching for ingredients | Mise en place not completed before cooking began. Solution: Never start cooking until all ingredients are prepped, measured, and positioned within arm’s reach. Prep and cooking are separate phases. |
| Forgetting ingredients exist until they expire | Pantry or refrigerator lacks visibility; items hidden behind others. Solution: Reorganize for visibility (no double-stacking), use clear containers, implement FIFO rotation when restocking. |
| Back or neck pain after extended prep work | Cutting board height incorrect for your body. Solution: Elbows should bend at 90 degrees when hands rest on board. Adjust with thicker board, lower surface, or anti-fatigue mat. |
| Shadows making it hard to see cuts | Overhead lighting blocked by body position. Solution: Add task lighting (under-cabinet LED strips or portable lamp) that illuminates cutting board directly without shadow. |
| Kitchen feels chaotic even when organized | Organization aesthetic but not functional. Solution: Reorganize by workflow, not appearance. Function over form—professional kitchens aren’t beautiful, they’re efficient. |
Success Metrics: Are You Ready for course 4?
You are ready to progress to course 4 (Understanding Your Stove, Oven, and Heat Controls) when you can:
- Describe your kitchen’s work triangle and identify its strengths and limitations
- Identify and describe the four work zones (prep, cooking, cleaning, landing) in your kitchen
- Demonstrate the damp towel technique and explain why cutting board stability is non-negotiable
- Explain the difference between active storage and deep storage and give examples of each
- State where your most-used tools are stored and confirm they’re accessible at point of use
- Describe your refrigerator organization, including where raw proteins are stored and why
- Explain the mise en place mindset and progressive cleaning principle
- Walk through a cooking task in your kitchen without searching for tools or ingredients
Skill Dependencies: What This course Enables
- Course 4: Understanding Your Stove, Oven, and Heat Controls builds on your cooking zone organization. With utensils accessible and workspace clear around the stove, you can focus on learning heat management rather than fighting your environment.
- Course 5: Kitchen Sanitation and Food Storage expands on the cleaning zone and refrigerator organization established here, adding detailed sanitation protocols and storage time guidelines.
- Courses 6–10: Knife Skills Series all depend on proper cutting board setup—stable positioning, correct height, organized workspace, and adequate lighting. Without these fundamentals, knife technique development is compromised.
- Course 16: Mise en Place transforms the workspace organization from this course into a complete preparation methodology. The physical organization you’ve established enables the systematic prep workflow mise en place requires.
- All Cooking Technique Courses: From sautéing to braising to roasting, every cooking method benefits from organized workspace, accessible tools, and the workflow principles introduced here. Smooth technique execution assumes smooth workspace function.
Key Takeaways: Workspace Organization Fundamentals
| Concept | Key Points |
| Work Triangle | Refrigerator-sink-stove relationship • Ideal total distance 12–26 feet • Work with strengths, compensate for weaknesses • Store items at point of use |
| Work Zones | Prep zone (cutting, ingredients) • Cooking zone (stove, active cooking) • Cleaning zone (sink, dishes) • Landing zone (staging area) • Separate to prevent crowding and contamination |
| Cutting Board Setup | Damp towel underneath always • Perpendicular to body • 90-degree elbow height • Workspace around board for ingredients and waste • Shadow-free lighting |
| Tool Organization | Frequency principle: daily = active storage, occasional = deep storage • Knives in dedicated accessible storage • Utensils in crock by stove • Pots near stove by frequency |
| Ingredient Organization | Refrigerator: raw proteins on bottom, daily items at eye level • Pantry: group by category, visibility, FIFO rotation • Spices: dedicated storage, everyday seasonings near stove |
| Workflow Principles | Mise en place: prep everything before cooking • Progressive cleaning: clean during downtime • Multi-task: back burners passive, front burners active • Separate timers for each component |
Conclusion: Organization Enables Excellence
At Chefts, we teach you to think like a chef—and professional chefs understand that workspace organization isn’t cosmetic or optional. It’s the infrastructure that determines whether cooking flows smoothly or becomes a constant battle against your environment. Every principle in this course addresses a real friction point that slows cooking, creates frustration, or increases danger.
Start by analyzing your current kitchen honestly. Walk through a typical cooking session and note every moment of friction: searching for tools, awkward board positioning, excessive walking, cluttered counters, poor lighting. Each friction point represents an optimization opportunity. You don’t need to fix everything immediately—pick one area (cutting board setup, knife storage, or ingredient organization) and optimize it completely. Then move to the next area.
Remember that workspace organization serves cooking, not aesthetics. A beautiful kitchen with tools stored in distant cabinets is less functional than a practical kitchen with tools positioned for efficiency. Professional kitchens are rarely beautiful—they’re functional. Prioritize function over form.
Workspace organization is dynamic, not static. As your cooking evolves, your organization should evolve. When you start baking regularly, baking supplies migrate to active storage. When you stop using a particular tool, it moves to deep storage. Continuous refinement keeps your workspace aligned with actual use patterns rather than theoretical ideals.
This is the Chefts promise: we teach you the systematic thinking that enables cooking excellence. Workspace organization is systematic thinking applied to physical space. When you approach your kitchen as a system to be optimized rather than a fixed space to work within, you gain the control that professional cooks take for granted. Transform your workspace, transform your cooking.